2018 Tag - Galley Hinge Screws Loose/Stripping

Hi all! My wife and I are proud new (second hand) owners of a beautiful 2018 Tag.
We took the Tag out for our first camping outing in Central Saskatchewan, Canada last weekend and had a blast.
While I was opening and closing the rear galley hatch of the Tag I happened to notice a bit of play in the hinge. Upon further inspection I noticed that a few of the screws toward the outsides of the hinge-trailer body connection appeared to be loose. The screws between the hinge and the galley hatch itself are fine.
Being a handy fellow, I had a screwdriver readily available and thought I should just snug them up!
Except there was no "snug" to be had... some of the screws are stripped.
Has anyone had any experience with a similar issue, if so, what was the fix?
My first thought was to re-tap and attempt the next size up in terms of hardware but I thought I would reach out first.
Background info: My nearest dealership is over 5hrs away so the "take it to the dealership" option is a fair ways down my list (even without selling organs to pay for gas).

Comments
-
Welcome, and I, like you, would go one size up on the hardware. I do NOT have personal experience with these particular fasteners however.
Someone here likely will offer additional input.
'21 T@G 5w Boondock, 2006 Toyota Land Cruiser
")
-
I also have a 2018 that I bought used.
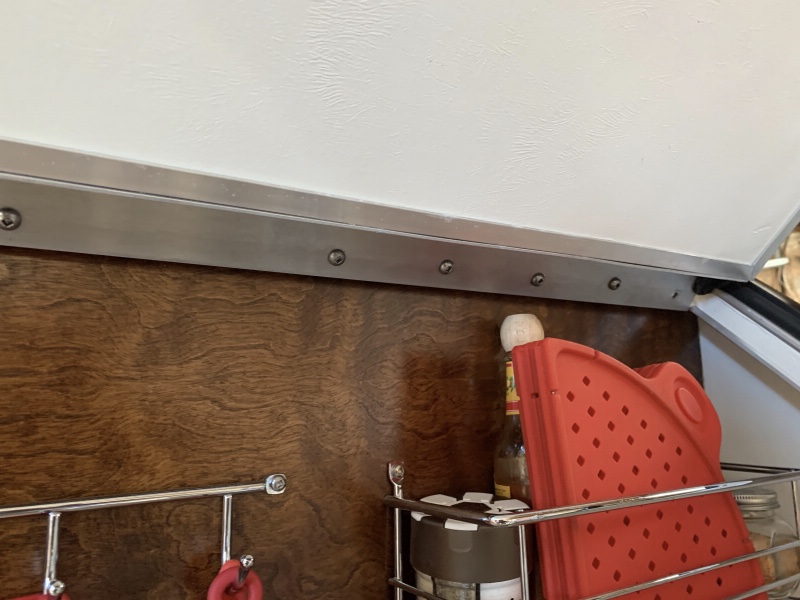
I assume the screws you mentioned are inside the galley at the top of the hinge. Hinge side that connects to the trailer and not the galley hatch. (See photo marked with red)
I took my camera and looked under, and what I can tell, the hinge screws go into wood (covered by some white tape/veneer/ vinyl waterproofing covering the hinge area on the outside)
I would be inclined to do two things.
1. Remove the screws (one at a time) and fill the hole with some wood filler/puddy, let dry and reinsert the screw(s).
2. Drill and insert some additional screws (around 9 new screws) (do not drill into the wood with the same size bit that you use for the metal hinge-use much smaller into the wood).
3. Admire your work and go camping again.
The hardest part may be finding matching square drive/Robertson screws to match what you have.
I am not sure of the length and of diameter the pan head (truss head) screws.
I would look on Amazon. Maybe a local hardware if you are lucky. My preference would be for stainless steel. You may have to buy a box, but then you would have extra.Please keep us posted on your repair.
Best of Luck!


-
@JamesDow thanks for the detailed response! The screws should be pretty easy to come by in my part of the world (Roberston are pretty much standard fare for everything up here).
Will keep everyone posted on the repair.
-
Had a closer look at my screw arrangement compared to yours. Somebody (previous owner) may have been down this road before… I have 5 screws/side on the outside of my hinge.
Still contemplating an increase in hardware size.

Also, the space behind the hinge mount appears hollow. I checked with a bent wire and could probe around behind the hinge cavity.

-
Looking at my pictures, it appears as if the wood is plywood. Could be thin (3/8"). This may why it appears hollow.
I still would be inclined to stuff each hole with some type of filler and then reinsert same size screws.
Your call. I am confident you will get it fixed.
___________________________

-
If you can get to the backside, the permanent solution would be to use a machine screw/washer/nut. Maybe even a locknut to ensure they never come loose again. I'm sure it will be a pain getting the nut on blindly but would definitely last forever.
Greg Brown
Bellevue, WA
2016 PVTT T@G -
@JamesDow good point, although if felt as if I was right through into the “void” before I even hit 3/8” depth. When I brought the wire back to scratch around the backside of the joint it made a scratchy sound as though I was hitting aluminum rather than wood. Could the wood just be a cap over an aluminum c-channel or similar?
@MrGGBrown agreed! Alas, I was unable to get at the backside.
I had a screw on hand that was the next size up (minor miracle, I know). It went in fine and seemed to re-establish the clamp force into the joint. Hinge play seems to be nominal now (standard flexing but no “wiggling”.
Thanks again for the discussion everyone!


Categories
- All Categories
- 3 Forum Rules
- 2 nüCamp & Forum Contacts
- 2 uCamp Rally - News & information
- 65 Air Conditioning & Refrigeration
- 297 Battery/Electrical & Solar
- 196 Camping & Travel
- 21 Events & News
- 1 "FOR SALE" - New & Used Trailers
- 3 "FOR SALE" - Camping & Trailer Gear
- 104 Heating/Plumbing & Winterizing
- 38 Help - Computer & System
- 135 Introductions
- 36 Looking to buy a Trailer?
- 379 Modifications & Upgrades
- 62 Newbie 101 Tips
- 126 Products & Accessories
- 19 Service/Maintenance & Recall Notices
- 3 Solo Travelers Hints & Tips
- 2 T@B Forum
- 5 Testimonials
- 30 T@G & Factory Comments
- 2 Teardrop Groups & Helpful Links
- 75 Tips & Tricks
- 130 Trailers & Towing
- 10 User Manual/PDF Files/Videos & Resources